
Why Texturizing Shears Can Help With Thick or Dense Hair
Standard shears cut every strand they close on, which can leave thick or dense hair looking heavy and blunt.
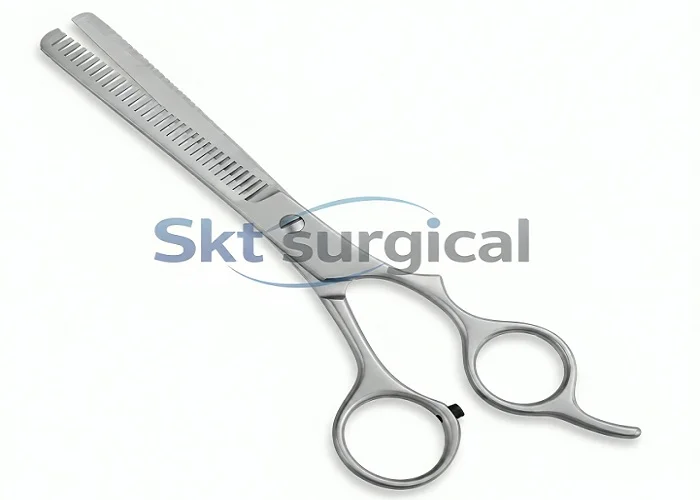
Texturizing shears, often called thinning or chunking shears (though brands and stylists use these terms differently), have teeth along the cutting edge.
Hair caught between a tooth and the opposing blade is cut, while hair that sits in the gaps between teeth passes through uncut, so only part of each section is removed. This can reduce bulk while largely preserving the visible length.
They are not necessary for everyone with thick hair. Whether they suit a particular cut depends on hair texture, density, the finish the stylist wants, and technique.
Depending on where and how aggressively they are used, they can also change the silhouette of a cut.
How the Teeth Affect the Result
The most common design pairs one serrated blade with one straight blade, though some designs have teeth on both. As a general rule of thumb:
- Fewer, wider teeth tend to remove more hair per cut, which suits thick or coarse hair and gives a chunkier texture.
- More, finer teeth tend to remove less hair per cut, giving a subtler effect that suits fine to medium hair.
Tooth count alone does not decide the result. Spacing, tooth shape, blade design, and the manufacturer’s stated cut rate (if one is published) all play a part.
Naming is also not standardized: brands use “texturizing,” “thinning,” “blending,” and “chunking” in different ways, so compare specifications rather than relying on the label. Many stylists keep more than one pair for different hair types and effects.
Technique Basics
Work in small sections
Hair that is removed cannot be put back, so start light.
Avoid repeated passes in the same spot
Each pass removes more hair, and over-thinning is hard to correct.
Placement varies by technique
Professionals position texturizing cuts differently depending on the look they want. For beginners, working conservatively through the mid-lengths and ends is generally easier to control.
Texturizing shears are a finishing tool and do not replace standard shears for setting length or shape.
Anatomy of the Shears
- Toothed and straight blades: These do the cutting. Edge geometry, alignment, and sharpness decide whether the shears cut cleanly or fold and pull hair.
- Tension screw (pivot): It sets how tightly the blades close. If it is too loose, hair bends between the blades. If it is too tight, the shears feel stiff and wear faster.
- Shank: The section between the blades and handles, which affects balance.
- Handles (bows): Ring shape and position affect hand and wrist posture. Offset handles, where one ring sits lower than the other, are common in professional designs.
- Finger rest (tang): A small extension where the little finger sits, giving extra control. Not every model has one.
- Finger inserts: Optional rubber or silicone rings inside the handles for grip and comfort.
Materials
Texturizing shears are generally made of stainless steel. The grade, hardness, heat treatment, and finish vary by manufacturer and affect edge retention and corrosion resistance, so ask the supplier rather than assuming.
Matte versus polished finish is mostly a matter of appearance and preference.
Choosing a Size
Hair-cutting shears generally range from about 5 to 7 inches in length. Shorter shears are often chosen for smaller hands and detail work, and longer ones for larger hands and broader sections.
A 6.5-inch length is one available option, and a 6.5-inch toothed texturizing shear is one example. Comfort in your own hand matters more than any single “ideal” size.
A Simple Care Routine
After every client
- Brush hair from between the teeth and wipe the blades dry.
- Clean and disinfect according to local regulations and workplace policy.
Periodically
- Add a small drop of shear oil at the pivot and wipe off the excess. How often depends on use and the manufacturer’s advice.
- Check the tension and readjust if the feel has changed.
- Have them professionally sharpened. Toothed blades have more complex geometry than straight ones, so choose a technician experienced with texturizing shears.
Always
- Store them dry in a case or sleeve, avoid drops, and use them on hair only.
Sterilization note: Autoclaving does not suit every pair, since heat and moisture can affect inserts, lubricants, and finishes. Follow the manufacturer’s instructions before choosing a method.
What to Check Before Buying Texturizing Shears
- How many teeth does the toothed blade have, and how are they spaced? Is a cut rate published?
- Can the tension be adjusted over time?
- Are left-handed versions true left-handed designs, or just reversed grips?
- What are the length, weight, and handle style?
- Are sharpening, replacement parts, and a warranty or return policy available?
Conclusion
Tooth pattern, blade condition, tension, and technique together determine how texturizing shears perform. Compare specifications rather than product names, test the fit in your hand where possible, and keep them clean, oiled, and dry.